
Welcome to this month’s Tech4stampers Academy Blog Hop
This month’s theme is make a Masculine greeting card
Hello Everyone,
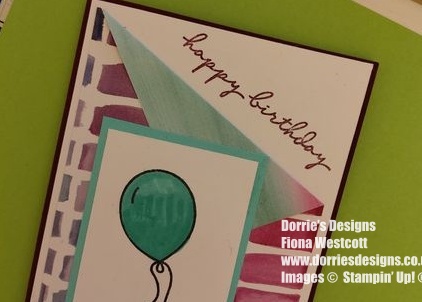
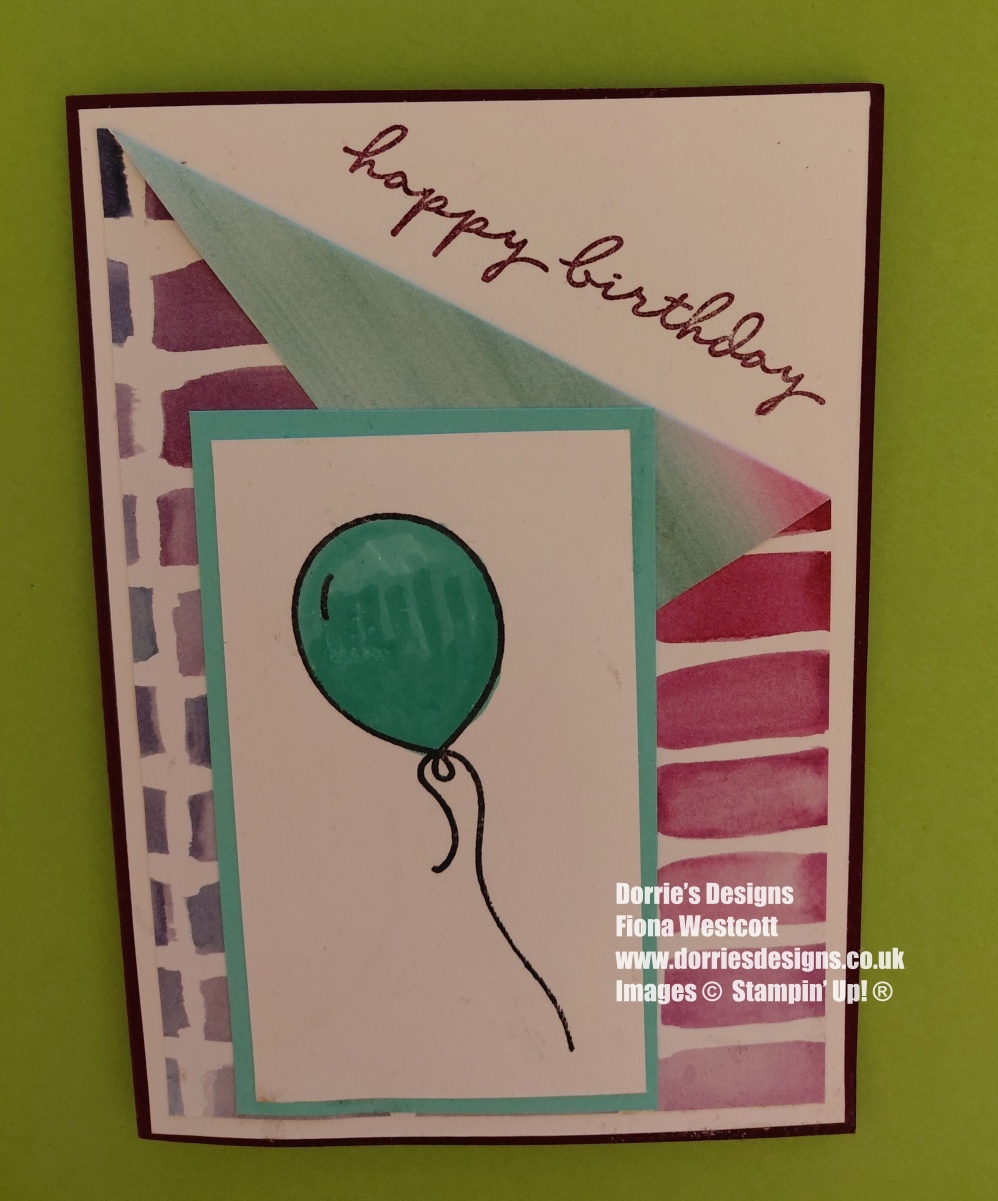
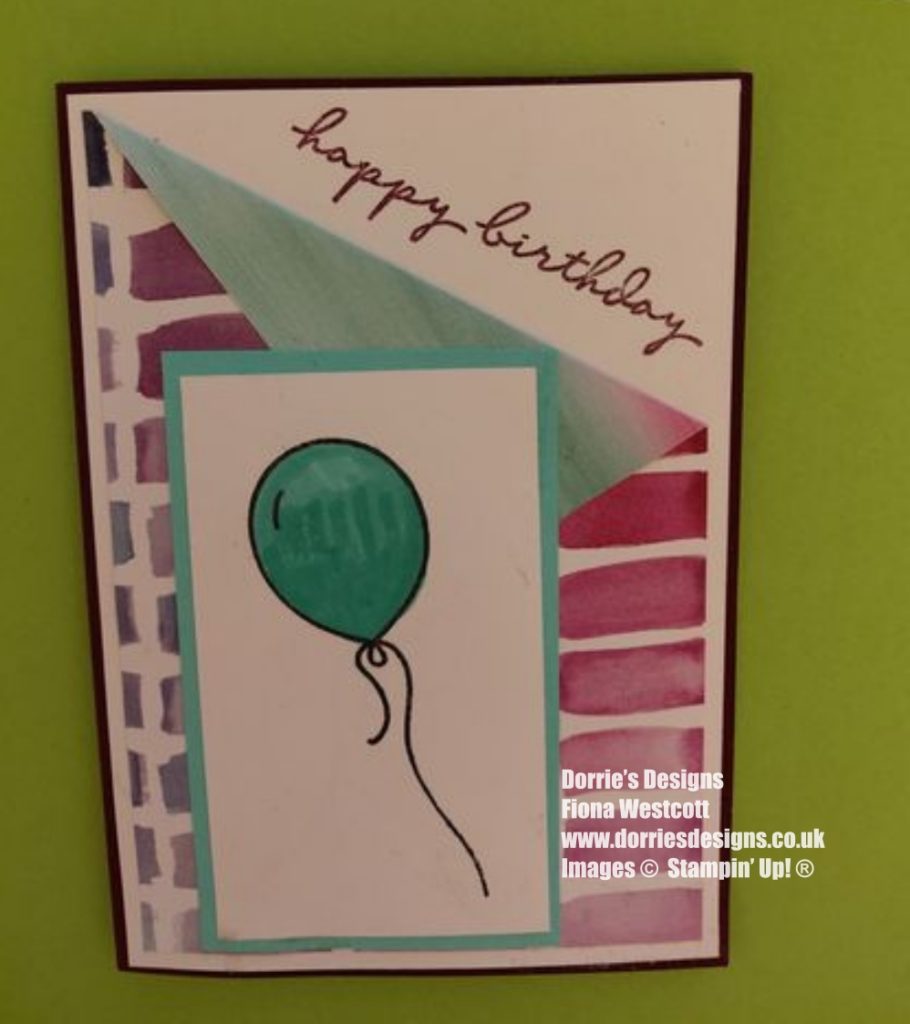
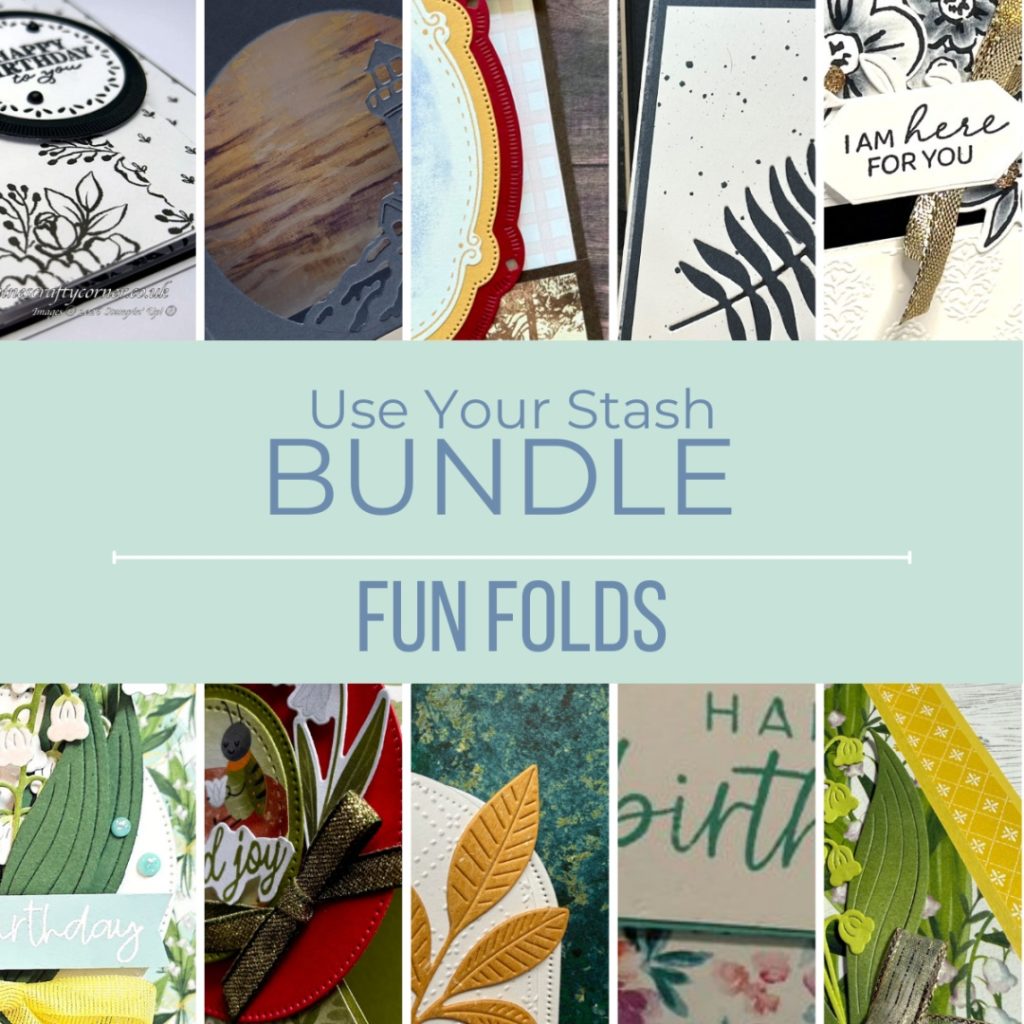
Hi and welcome! I’m so excited to be joining in with this month’s Tech4Stampers Academy blog hop, where the theme is all about masculine greeting cards. I have chosen to show you how I created my Corner Fold birthday greeting card.
May seems to be a month where lots of my friends have birthdays so I wanted to make a card that would be quick and easy to make and to reproduce using different colours, stamps and patterned paper.
I used the beautiful Arched Wishes stamp set – it’s one of my current favourites and an online exclusive with Stampin’ Up! right now. While there are coordinating dies available, I kept things simple and stuck to just the stamps for today’s designs.
I also used one of my favourite patterned papers called Full of Life – I am so happy this cheerful collection didn’t retire when the Stampin’ Up! annual catalogue retired and is now an online exclusive. The colours and patterns are just so vibrant and happy, and I think they really help make any card feel extra special. Honestly, it’s hard not to smile when you see it!
Corner Fold Birthday Greeting Card
Materials I used to make my Corner Fold Birthday Greeting Card
- Blackberry Bliss card base 21cms x 14.90 cms scored at 10.50 cms
- Summer Splash 10cms x 6.50cms
- Patterned paper 13.9 x 9.50
- 2 x Basic White card 14.4 x 10 cms
- 1 x Basic White card 9.5 cms x 6 cms
How I made my Corner Fold Birthday Greeting Card
- Burnish your fold on your card base.
- Glue one of the Basic White layers to the outside of the card base.
- Make a mark 4 cms down on the long right side of the patterned paper.
- Score from the top left corner to the mark on the right side and fold this and glue down so the reverse side of the patterned paper is showing.
- Glue this down onto the Basic White matt layer.
- Stamp your image onto the smaller Basic White card and colour in.
- Glue this onto the Summer Splash card base colour and glue this onto your card.
- Stamp your sentiment on the Basic White card in the top right corner
- Glue the remaining Basic White matt layer inside your card. I stamped two balloons inside to decorate.
My finished Corner Fold Birthday Greeting Card
I have now made a batch of 10 Corner Fold birthday greeting cards which are now put safely away in my box where I keep all my cards, ready for my to write in and post with Herbie when we go out on a walk sometime. I had so much fun creating my Corner Fold birthday greeting card today, I hope I inspired you to sit and create a Corner Fold birthday greeting card to send out some happy mail out to cheer someone up. I would love to see what you create so please do share.
Well that’s it from me today, it’s time for Herbie and I to call on Mum and go out for a walk. It’s so nice and sunny. I think I will take Herbie to Goodrington Sands for a run in the park and on the beach and then maybe a treat of a sausage. Herbie has a challenge every Wednesday on my Dorrie’s Designs facebook page where he asks a question and is rewarded with sausages. He does so well, currently we have an IOU with sausages so I can spread them out. I am a mean Mummy as I don’t let him have one every time we pass one of his favourite sausage shops.
Until next time stay safe and happy crafting.
Please click on the names below to visit each website and see what lovely projects my other friends in the Tech4Stampers Academy Group have designed for their Fancy Fold blog hop. Please do leave comments as you visit each one.
Blog Hop List
Product list
/strong>![Arched Wishes Cling Stamp Set (English) [ 165428 ]](https://assets1.tamsnetwork.com/images/EC042017NF/165428s.jpg "Arched Wishes Cling Stamp Set (English) [ 165428 ]")
![Blackberry Bliss A4 Cardstock [ 133682 ]](https://assets1.tamsnetwork.com/images/EC042017NF/133682s.jpg "Blackberry Bliss A4 Cardstock [ 133682 ]")
![Summer Splash A4 Cardstock [ 163798 ]](https://assets1.tamsnetwork.com/images/EC042017NF/163798s.jpg "Summer Splash A4 Cardstock [ 163798 ]")
![Basic White A4 Cardstock [ 166781 ]](https://assets1.tamsnetwork.com/images/EC042017NF/166781s.jpg "Basic White A4 Cardstock [ 166781 ]")
![Full Of Life 6" X 6" (15.2 X 15.2 Cm) Designer Series Paper [ 163357 ]](https://assets1.tamsnetwork.com/images/EC042017NF/163357s.jpg "Full Of Life 6\" X 6\" (15.2 X 15.2 Cm) Designer Series Paper [ 163357 ]")
![Summer Splash Stampin’ Blends Combo Pack [ 163826 ]](https://assets1.tamsnetwork.com/images/EC042017NF/163826s.jpg "Summer Splash Stampin’ Blends Combo Pack [ 163826 ]")
![Blackberry Bliss Classic Stampin' Pad [ 147092 ]](https://assets1.tamsnetwork.com/images/EC042017NF/147092s.jpg "Blackberry Bliss Classic Stampin' Pad [ 147092 ]")
![Tuxedo Black Memento Ink Pad [ 132708 ]](https://assets1.tamsnetwork.com/images/EC042017NF/132708s.jpg "Tuxedo Black Memento Ink Pad [ 132708 ]")
![Paper Trimmer [ 152392 ]](https://assets1.tamsnetwork.com/images/EC042017NF/152392s.jpg "Paper Trimmer [ 152392 ]")
![Bone Folder [ 102300 ]](https://assets1.tamsnetwork.com/images/EC042017NF/102300s.jpg "Bone Folder [ 102300 ]")
![Clear Block E [ 118484 ]](https://assets1.tamsnetwork.com/images/EC042017NF/118484s.jpg "Clear Block E [ 118484 ]")
Free Tutorial With all Orders
When shopping through my Stampin’ Up! Online Shop, you will receive a FREE TUTORIAL of 11 simple card ideas. Learn More!
If you wish to shop with me, please click here
Thank you for shopping with me.
I am an Independent Stampin’ Up! Demonstrator for the UK, France, Germany, Ireland, Belgium, Austria, and the Netherlands.
Herbie and I would love you to shop with us. If you set up an online account with us and opt in for Stampin’ Up! Rewards for every order over £20 you will receive 10% rewards to use on your next order, or you can do like I do and save them for a future order. They soon mount up, enabling you to purchase more expensive products with your saved rewards. Please do ask if you need any help.
SUBSCRIBE TO PAPER PUMPKIN Get a different surprise kit each month through the post. The monthly subscription price also includes postage.
KITS, I particularly love the Kits as everything is included, making them ideal for the beginner crafter, the crafter with limited space, they make beautiful birthday presents and are small enough to pack to take away on holiday. There are two new kits every month.
ONLINE EXCLUSIVES These are beautiful products that aren’t in any catalogue. Check back regularly as it’s frequently updated.
Postage is a flat rate of £6.95/€7.95 on all orders.
🌟 Got a crafty wish list a mile long? Why not come and join our team, The Crafty Caterpillars! We’re building a welcoming, inclusive community where everyone’s invited to create, connect, and have fun. Whether you’re a beginner or a seasoned crafter, we’d love to craft with you—in person or online!
🎁 Right now you can grab £130 worth of products for just £99
If you need any help or have any questions, please send us a message.

I love your corner fold card! So cheerful!
Thank you so much Diane, I had so much fun creating it.
What a fantastic way to add extra interest to a card! Love it.
Thank you Leighsa.
Love the corner fold, tfs.
Thank you Elaine